In this post, we will be telling the search engines, Google, Bing and Yahoo all about your new blog! Drum roll please, this is part of the official launch!
In the previous tutorial, you learnt how to create your XML sitemap. If you haven’t created your XML sitemap yet, see How to Create a Sitemap for Your WordPress Blog.
Now you have your XML sitemap, the next step is submitting this document to the Google, Bing and Yahoo search engines.
What You Will Need
- You will need the have the Yoast SEO plugin installed on your WordPress website. I’m using this plugin to verify your website with both Google and Bing. This is the quickest and least complicated way of verifying your website. I especially recommend doing it this way if you are a beginner.
- You will need the URL for the sitemap that you generated with the Yoast SEO plugin. It should look something like this: http://www.myblog.com/sitemap_index.xml
So if you’re ready to launch your blog, let’s get started!
How to Submit Your XMS Sitemap to Google
1. Connect Your Website with Google Search Console
Google Search Console is a free service offered by Google that helps you monitor and maintain your site’s presence in Google Search results.
To set up and account, go to https://www.google.com/webmasters/ and sign up for a Google Search Console account using your Google account username and password. If you have a Gmail account you can login with those account details.
Google only requires one username and password for all Google applications so you can sign in to Google Search Console with the same details as your Gmail account.
If you don’t have a Google account already, create a new Google account. If you have been following the Starting Smart Online tutorials, you will have created a Google account when you signed up for Google Analytics.
Once you are in Google Search Console, you can add your website by typing the URL into the box that appears and clicking on the red button ADD A PROPERTY.

Note: In your Google Console account, your website is also referred to as a “property”. ps. This image might look slightly different to what you see as I’ve already created an account.
2. Verify Your Site with Google
To submit your blog’s sitemap to Google, Google first wants to verify that you are the owner of the website. On the next screen you select your preferred Verification method.
Select the Alternate methods tab.
Check HTML tag which is the first option. You will need to copy the code between the parentheses. In the example below the code you need is in bold.
Example: <meta name=”google-site-verification″ content=”C430C923452342367BBB32453345015E5” />
Go to your WordPress dashboard and in the menu under SEO, click on Dashboard.
Click on the Webmaster Tools tab.
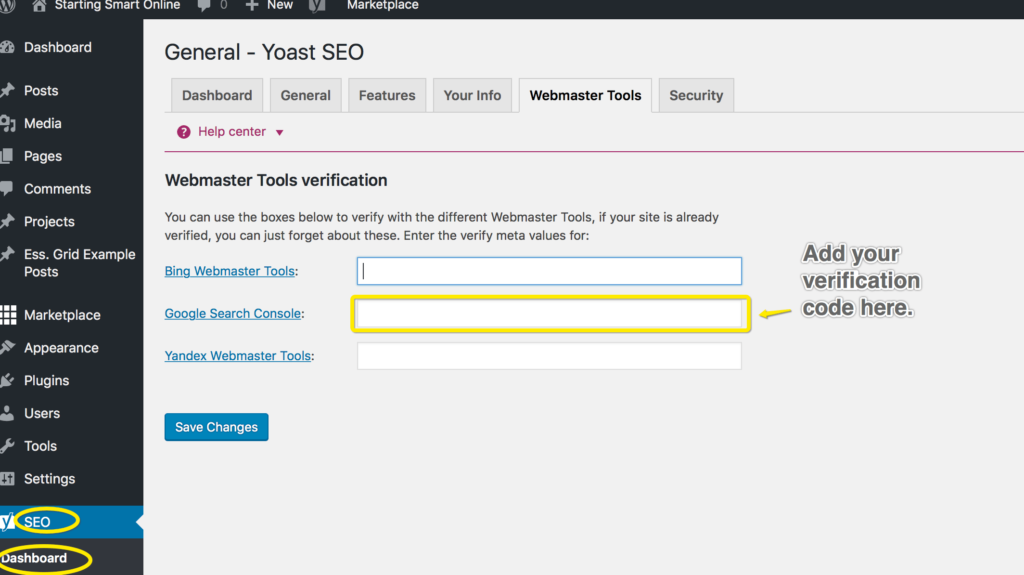
Enter the Google code into the Google Search Console field.
Save changes.
Now go back to Google Search Console and click on the Verify button.
If all goes well Google will send you a note of congratulations and confirm that your ownership has been verified.
If you encounter any errors, this Google support page is helpful for troubleshooting.
3. Submit Your Sitemap to Google Search Console
Now Google has verified you are the owner of the website, you can submit your sitemap.
Go to the “Home” area in your Google Search Console account. If you create multiple websites all your properties will appear here.
Select your website URL.

Next click on Sitemaps.
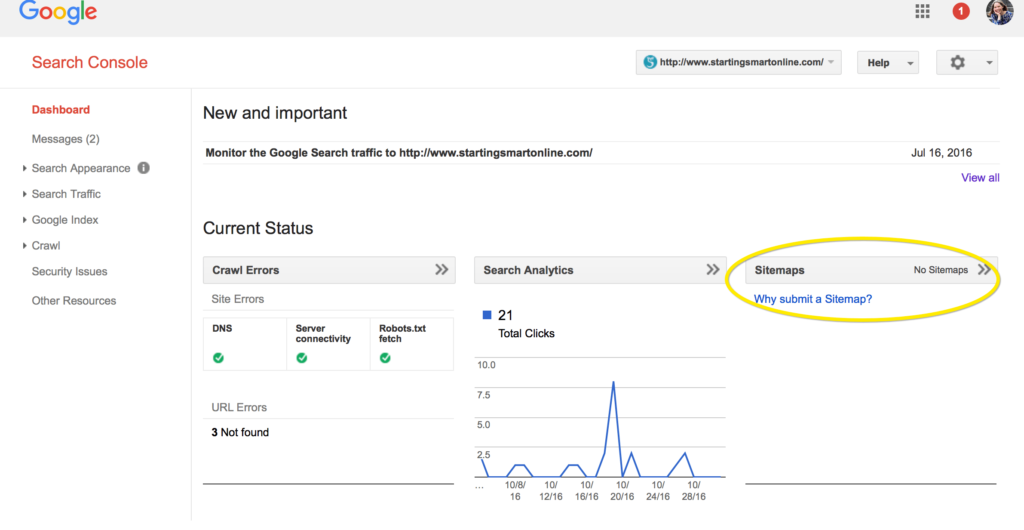
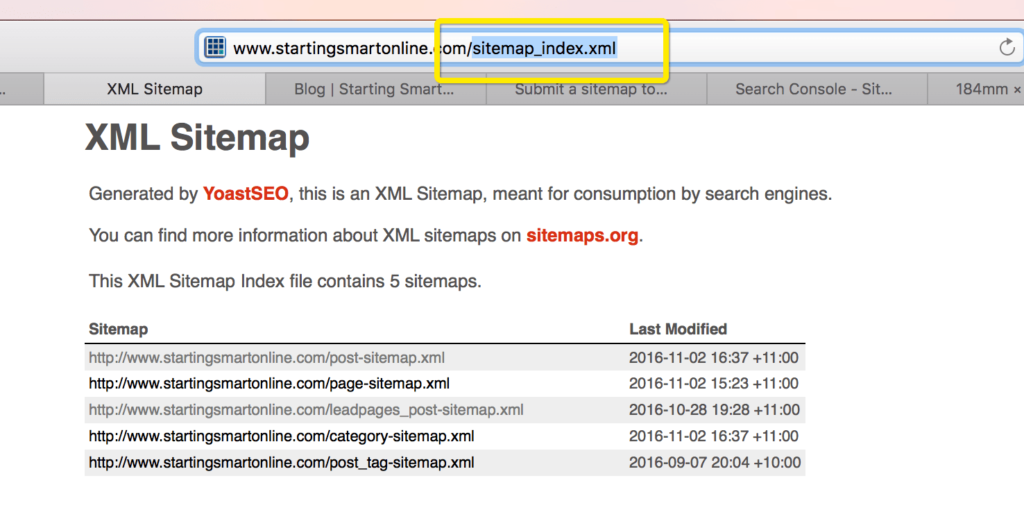
You will need the URL for the sitemap that you generated with the Yoast SEO plugin. It should look something like this:
http://www.myblog.com/sitemap_index.xml
This is what your XML Sitemap should look like (see image below). You can access it from your WordPress dashboard in the SEO menu option>>XML Sitemaps and in the General tab – click on XML Sitemap. This is the section of the URL that you need: sitemap_index.xml
 Now you have the URL, select Add/Test Sitemap.
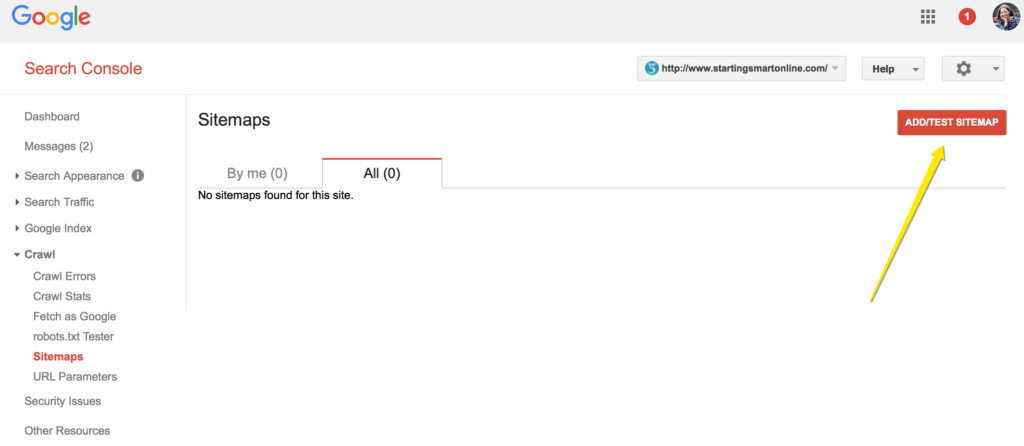
Now add your sitemap URL as shown below.
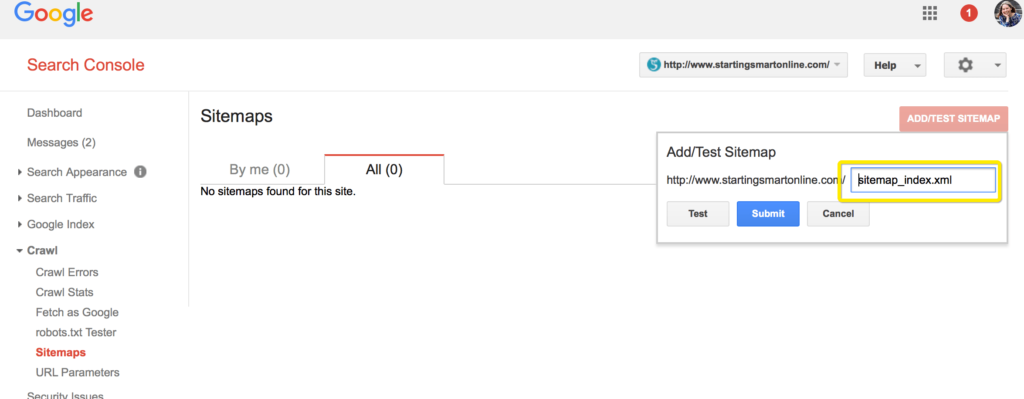
Click on Submit.
You may need to refresh the page. Once done, you should see that Google has processed your sitemap.
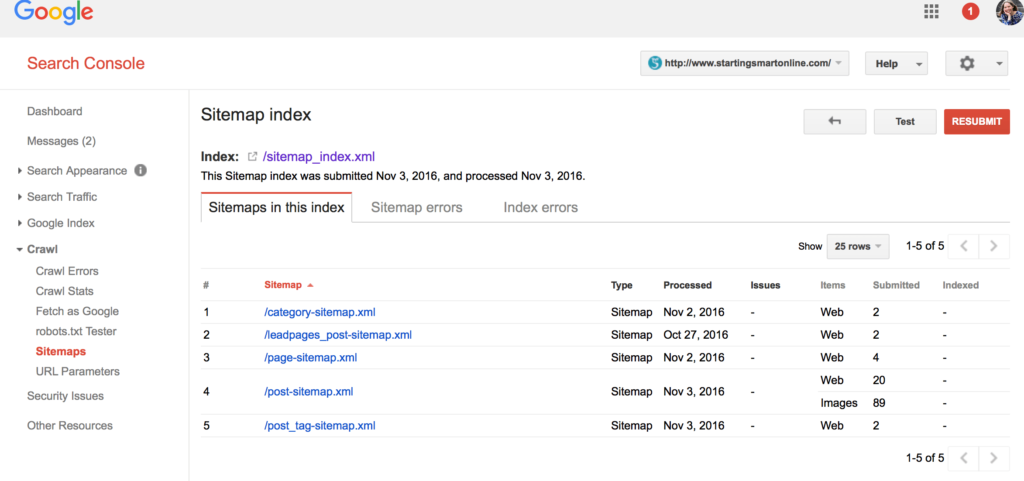
How to Submit Your XML Sitemap to Bing & Yahoo
To make things easy, by submitting your website to Bing you also submit to Yahoo at the same time.
Firstly, you will need to create an account with Bing’s webmaster at http://www.bing.com/toolbox/webmaster.
As Bing is owned and operated by Microsoft, you use your Microsoft password to log in to the Bing webmaster.
Similar to Google, only one username and password is required. You might recognise your Microsoft account as your Hotmail or Outlook account. Use those same login details. If you don’t have a Microsoft account, you will need to create one.
Once you are into the Bing webmaster dashboard, type in your URL as shown below and click on Add.
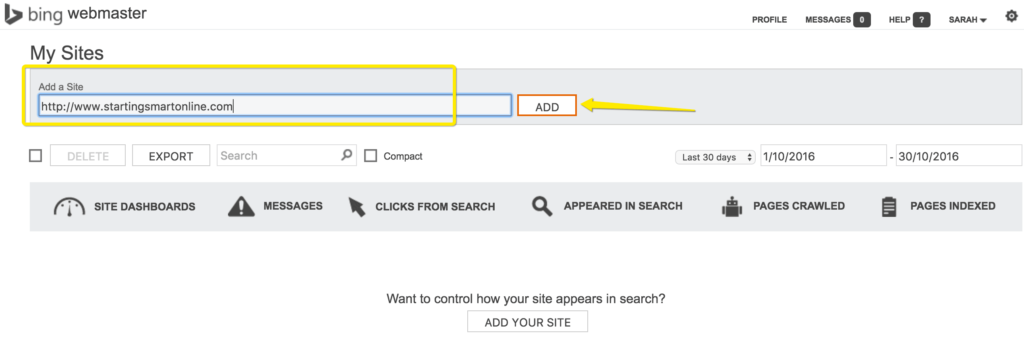
Now add your website URL and your sitemap URL. This time make sure you add the entire URL for your sitemap.

Bing also require verification of ownership. In this tutorial we will be using Option 2. to verify your website. You will need to copy the code between the parentheses. In the example below the code you need is in bold.
Example: <meta name=”msvalidate.01″ content=”C430C923452342367BBB32453345015E5” />
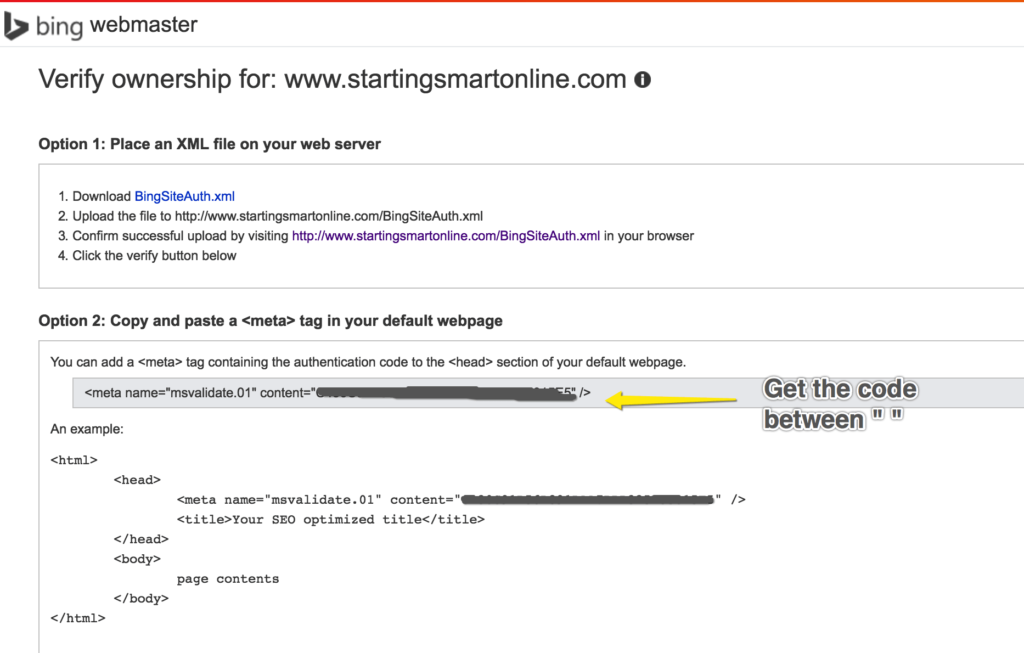
Go to your WordPress dashboard and in the menu under SEO, click on Dashboard.
Click on the Webmasters Tools tab.
Enter the Bing code into the Bing Webmasters Tools field.
Save changes.
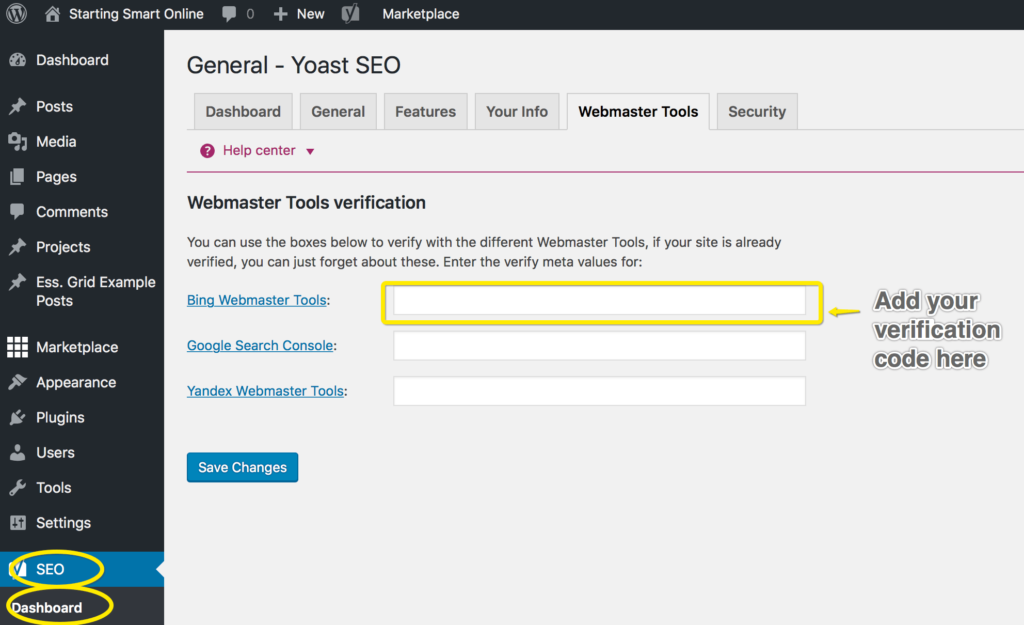
Head back to your Bing webmaster verification page and click on Verify.
Your sitemap has now been submitted.
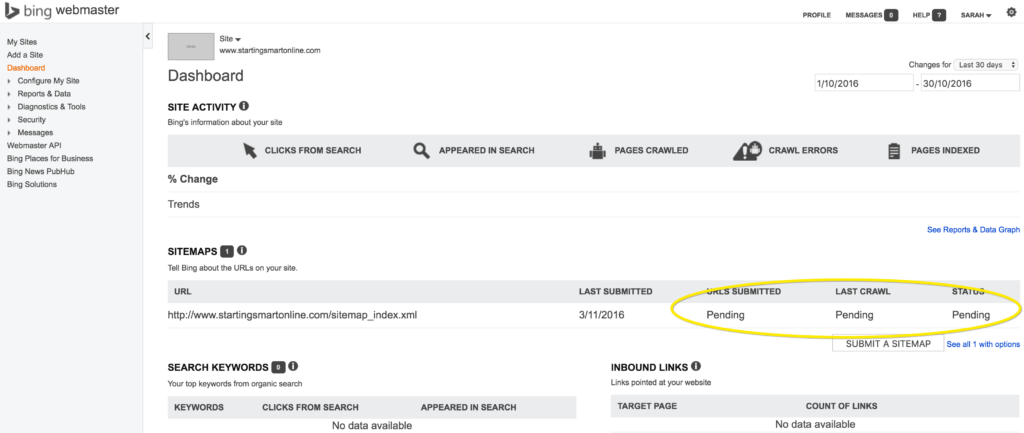
The status will show as pending and this may take a few hours to a few days before it is crawled by Bing.
Congratulations! Your website it officially “out there!”.
It will take some time before you start to see your posts and pages on the search engines but hopefully before long your blog will start to gain some traction.
Good luck!
You might also like…
AUTHOR: SARAH PILATI Hi, I’m Sarah! I’m here to help you create your first WordPress blog. I cover the early stages of your project – getting your website up and running! If you have any doubts you can do it yourself, this website is for you! You can get started here.





0 Comments